

Welcome to this latest edition of our Workbench blog and all the news, updates and modelling exclusives from the fascinating world of Airfix.
When it comes to scheduling subject matter for our Workbench blog throughout the year, we are fortunate that we rarely have a week where something new and interesting isn’t made available to us. Clearly, of greatest interest to our readers are the features which introduce new tooling projects to the current Airfix kit range and how we are given the opportunity to follow their progress through every stage of their development, from announcement to initial release, however, these features do not have a monopoly on our attention. Sometimes, the impending release of a new, re-issued or classic kit can be the stimulus for an interesting Workbench feature and as we found out with our Vintage Classic suggestions issue in the weeks leading up to last Christmas, there are plenty of people out their who love to talk classic Airfix.
That is where we find ourselves with this latest edition of the blog, as we welcome the return of two classic kits and the timely re-issue of another which may have only been tooled in 2010, but must still be considered something of a classic, by virtue of its sheer popularity. Our subject matter for this 177th edition of Workbench will be a pair of interesting Vintage Classics tanks, the arrival of our scale representation of arguably Britain’s most successful fighter aircraft of the post war era, with a little interesting Airfix website development thrown in for good measure. We have much to get through, so let’s make a start straight away.
With images like this to set our imaginations racing, it’s no wonder military vehicle kits have been a big part of the Airfix story since the early 1960s.
Looking at the magnificent box artwork image above, it isn’t difficult to see why tanks and armoured fighting vehicles have captured the imaginations of millions of people, since the very first machines rumbled onto the Somme battlefield in September 1916, something which continues to this day. The awesome power these machines possessed, allied to the fascinating variation in size, weight and shape of the different designs make tanks both visually appealing and interesting to study, and from a modelling perspective, why would you not want to build a scale collection of the world’s most famous tanks? On the subject of scale, the image above was produced to support the release of our new Tiger I starter set, a newly tooled model only introduced to the range last year and produced in 1/72nd scale, however, as far as Airfix military vehicle kits are concerned, that has not always been the case.
The history of the Airfix brand is a fascinating subject and for those Workbench readers who now have a few years under our belts, forms a huge part of our lives and not just during our formative years. Even though the first aircraft model construction kit released back in 1955 was produced in 1/72nd scale, the first military vehicles produced several years later were designed in 1/76th scale and for a very good reason. This scale conformed with the traditional 00 scale model railways which were existent at the time and as it was thought these models would be used as diorama additions to existing layouts and scenic products, it seemed to be the logical tooling decision. Also, during the early 1960s, the company were tooling up for a variety of new products, including railway rolling stock kits and in 1961, the Sherman and Panther tanks, many of which were made to 00 scale. So why our decision to design our latest military vehicle toolings in 1/72nd scale? That is just another interesting aspect of the ever evolving Airfix story, but one for a future edition of Workbench.
With tank and military vehicle models appearing in their respective Airfix ranges for over sixty years now, many of us will no doubt be familiar with at least a few of the different kits released during this time, models which reflected the fascinating diversity of designs the military vehicle world has to offer and whether it is a Great War Mk.I tank or a Cold War Chieftain that takes your fancy, there was usually an Airfix kit available for our modelling pleasure.
The two Vintage Classics tank kits we are featuring this week couldn’t represent the fascinating diversity of world tank design more effectively and even though they were introduced only six years apart, could two tank designs look any more different? Let’s take a quick look at each in turn now, starting with the smaller machine, but the one which was saw greater service during the Second World War.
A01319V - Japanese Type 97 Chi-Ha Medium Tank
Does Airfix get any more ‘classic’ than this? The Japanese Type 97 Chi-Ha Medium Tank may not have been the most powerful tank of the Second World War, but it was one of the most interesting and when combined with the artwork of Roy Cross, this made for an irresistible combination.
The ubiquitous Japanese medium tank of the Second World War, the Chi-Ha was the second most heavily produced Japanese tank of the war and would appear on battlefields right across the Pacific Theatre. Intended to equip the Army with a fast and reliable infantry support tank, the main armament of the Chi-Ha may have been sufficient when supporting fast moving infantry actions, however, it was found wanting when it came up against opposition armour, particularly if those opposing tanks were protected with thick armour. The tank’s main 47/57mm main gun was backed-up by a trio of machine guns in the hull and turret, for use in both an offensive role and to protect the tank’s four man crew.
The story of Japanese tank development is quite an interesting one and started in the years following the end of the Great War. Before that time, Japan didn’t have any tanks in service and were keen to assess the capabilities of this powerful new weapon, so they arranged to purchase several British machines, for evaluation soon after the cessation of hostilities, conducting extensive trials which would last through much of the following decade. Right from the outset, they were clear that they didn’t want to have to rely on a foreign supplier for their future tank needs, preferring to establish an indigenous manufacturing capability, should they be needed for war. In any case, as a result of their extensive testing, they were of the opinion that western industrial manufacturing standards were significantly inferior to their own.
For this unusual, yet extremely appealing tank subject, the scheme details feature a tank from No.3 Squadron, No.1 Tank Division involved in actions in Malaya during 1941/42.
Produced by Mitsubishi Heavy Industries, the Chi-Ha tank featured a bolted hull construction method and adopted a variation of the rather crude bell-crank spring loaded suspension system which featured on the smaller Type 95 Ha-Go, only this time incorporating six road wheels on either side of the hull, with two paired and two running independently. The main gun was a 57mm weapon which was ideal for infantry support duties, but was found wanting when coming up against opposition armour, as this was not really what the Chi-Ha was designed to do. Built for combat effectiveness and easy maintenance, the Type 97 also featured an excellent Mitsubishi V12 diesel engine, one which powered this 15 ton tank along at a respectable 24 mph, but with an absolute minimum of maintenance time required.
Early combat experiences in China immediately led to calls for this tank to be up-gunned, so it could better compete with enemy armour, calls which would eventually result in the introduction of the Chi-Ha Kai variant, which featured a new high velocity 47mm gun. In combination with the smaller Ha-Go, the Type 97 Medium Tank would form the backbone of IJA and IJN tank support for military operations across the wider Pacific region and were therefore the tanks which Allied ground forces encountered most often during the Second World War. Their well-trained crews and the general suitability of this tank to Pacific conditions led to them initial successes, especially when pitted against the American M3 Light Tank, however, as the war progressed, they would become increasingly ineffective against the large numbers of M4 Shermans now being committed to combat.
Resplendent in its Vintage Classics packaging, this will be the first time this kit has been in an Airfix range for ten years, so keep an eye out for this box!
During the final stages of the Pacific war, many Chi-Ha tanks would actually be buried into armoured defensive positions, with just the turret remaining above ground. Although this made the tanks less vulnerable to enemy fire and could be a nasty surprise for any US unit approaching its position, it rendered the tank immobile, massively reducing its strategic effectiveness. Underlining the increasingly desperate situation Japan found herself in during the latter stages of WWII, the final few production batches of these tanks were not sent to bolster the fighting across the Pacific, but were held back in mainland Japan in preparation for the anticipated Allied invasion which was surely now just a matter of time. Almost 2,100 of these tanks were eventually produced and whilst many wrecked and rusting hulks lie right across the former Pacific battlefields, relatively few can be found on display in the world’s military museums.
From an Airfix perspective, the Chi-Ha was originally tooled back in 1974 and in order to welcome this attractive little kit into the range, a certain Mr Roy Cross was commissioned to produce the distinctive box artwork you can see here, a sight many Workbench readers will no doubt be familiar with. Possibly the only example of a WWII Japanese tank many people will have in their collections, the Type 97 Chi-Ha Medium Tank is available now as the latest release in our popular Vintage Classics range.
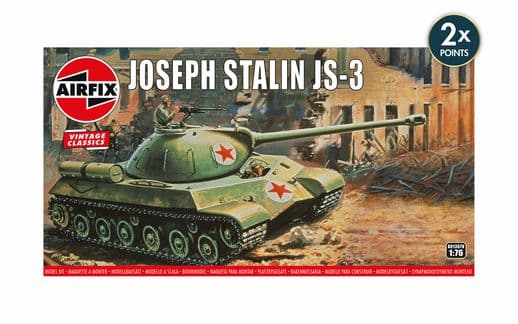
A01307V - JS-3 Joseph Stalin Tank
Classic Airfix box artwork really is the visual gift that just keeps on giving. This time, Mr Cross presented the latest Soviet heavy tank in the ruins of a war-torn Berlin.
Although it is often German and American tanks of the Second World War which receive much of the enthusiast attention, the Soviet Union could boast some of the most effective tanks of the entire war, many of which were produced in great numbers. At the absolute head of this list of impressive armour was the T-34, a medium tank which was introduced during 1940 and one which was designed around the Soviet philosophy of having an effective, reliable tank available on the battlefield in large numbers, helping the Army to repel any enemy incursion into their territory. The T-34 was this and much more, the almost perfect combination of speed, reliability, firepower and armour protection, with its basic design flexible enough to accept seemingly endless armament upgrades.
When the German’s first encountered the T-34, it came as something of a sobering surprise, with one General even describing it as ‘The finest tank in the world’. It would stimulate a tank development race between the two nations which would result in ever more powerful tanks being unleashed on the battlefields of Europe.
In order to facilitate the use of ever larger main guns, the T-34 chassis eventually had to give way to larger designs, leading to the introduction of the IS-2 Heavy Tank in 1944, a powerful tank which would go on to see active service during WWII and one which struck fear into the hearts of any German tank commander. With the immense weight of these iron monsters initially limiting the operational life of an IS-2 to around 621 miles covered, further development of these heavily armed tanks would eventually lead to the introduction of the IS-3 or JS-3 Joseph Stalin Heavy Tank, battlefield behemoths which would send an armoured shockwave throughout the western world.
Taking all the knowledge they had gained throughout their heavy tank programme, the Soviets equipped their new JS-3 with the same high velocity 122mm main gun, but housed it in a very different turret, one which resembled something like an upturned bowl. The relatively low profile of the tank was dominated by the huge main gun, which protruded well past the front of the tank’s hull, however, the need to utilise new manufacturing jigs caused development delays which resulted in the JS-3 missing the fighting at the end of WWII. There were reports that three pre-production tanks assigned to an independent Guards Unit were rushed to the front lines to take part in the Battle of Berlin and came across a formation of Jagdpanthers they engaged in combat, however, these reports have no official corroboration and must therefore be regarded as just rumour.
Clearly highlighting the fascinating diversity of military vehicle design during WWII, the massive JS-3 Heavy Tank could hardly be more different from the Japanese Type 97 which now accompanies this kit into our Vintage Classics range.
Despite missing the last of the fighting, the JS-3 would play a major role in concentrating the minds of the other victorious Allied leaders and effectively help to propel the world into a dangerous Cold War era. Proud of his impressive new tank, Stalin ensured that his 71st Guards Heavy Tank Regiment and their JS-3 tanks would play a prominent role in the Allied Victory Parade which took place in Berlin on 7th September 1945. Whilst the world looked on in complete awe, British and American tank designers were already hard at work developing their own heavy tanks, ones which were capable of challenging these new Soviet beasts.
This ominous looking tank was actually quite a simple design, however, conditions for its crews could be rather brutal and although it was unlikely that anyone was ever brave enough to make an official complaint, the life of a JS-3 crew member was not a particularly comfortable one. The relatively cramped interior would only allow limited space for the stowage of ammunition and with this massive 122mm gun requiring two part ammunition, a maximum of only 28 rounds could be carried at any one time.
Due to the prominent, pointed appearance of the tank’s frontal armour, JS-3 crews christened their charges ‘The Pike’, a rather unflattering name for a tank which would set the tone of world tank design for many years to come.
Joining the Vintage Classics range for the first time, the JS-3 Joseph Stalin Heavy Tank may have only played a peripheral role in the final stages of WWII, but it would have a huge impact on world tank design during the Cold War years.
From an Airfix perspective, the Chi-Ha and JS-3 could hardly be more different, occupying opposing positions within the hierarchy of world tank design. The Joseph Stalin weighed in at almost exactly three times the weight of the Type 97 and its main gun was powerful enough to slice through a Chi-Ha at ranges where Japanese crews would hardly have been able to even see one of these Soviet beasts in the distance.
As a model kit, the JS-3 Joseph Stalin Heavy Tank was first introduced to Airfix fans in 1962, twelve years before the Chi-Ha was produced, but in-keeping with a trend which is still much admired by Airfix enthusiasts everywhere, was a project which also benefitted from the creation of a Roy Cross box artwork masterpiece.
Marking a particularly welcome armoured addition to the Vintage Classics range, both the JS-3 Joseph Stalin Heavy Tank and the Japanese Type 97 Chi-Ha Medium Tank are available in our warehouse now and should also be in stock with your usual model supplier.
For those of us who were alive forty years ago and old enough to remember watching the news back then, the title of this section of the blog will probably bring back some vivid memories, ones which remind us of a time when Britain was at war and her military forces were facing an incredibly perilous situation. On 2nd April 1982, a relatively modest Argentinean amphibious force landed on the Falkland Islands, occupied the islands and claimed sovereignty. This seismic development resulted in detailed military arrangements which were being planned in Britain taking on a dramatic increase in pace, as they assembled a powerful naval Task Force, one which was ordered to sail for the South Atlantic at the earliest opportunity and to re-take the Islands from their unauthorised occupiers.
Britain’s naval Task Force consisted of 127 vessels, headed by the two aircraft carriers Hermes and Invincible and providing the crucial air defence of this force were just 20 (initially) of the Fleet Air Arm’s Sea Harrier jets, the navalised variant of the VSTOL Harrier which had been in service for four years at that point. As the force left Portsmouth and steamed for the South Atlantic, how could this small force of Sea Harriers possibly stand a chance against an Argentinean air armada which numbered at least 100 serviceable aircraft and possibly as many as 170 in a worst case scenario. The odds facing them were arguably much greater than those facing the ‘Few’ of the Battle of Britain some forty-two years earlier.
From a modeller’s perspective, perhaps the most interesting aspect of Sea Harrier operations during the Falklands War concerns the paint schemes they wore, which turned out to be less than consistent and much different to their usual pre-war Squadron schemes.
The famous statement used as our feature header above was delivered by BBC war correspondent Brian Hanrahan, a member of the British press who was attached to the Task Force and based aboard the aircraft carrier HMS Hermes. Bound by stringent reporting restrictions, he was not able to give details of losses, casualties or victory claims, but in order to provide a modicum of reassurance to a nation worried about their boys and perhaps of even greater importance, the families of service personnel engaged in the conflict, his ‘I counted them all out and I counted them all back’ statement confirmed that the Sea Harrier’s latest missions were completed without suffering any losses.
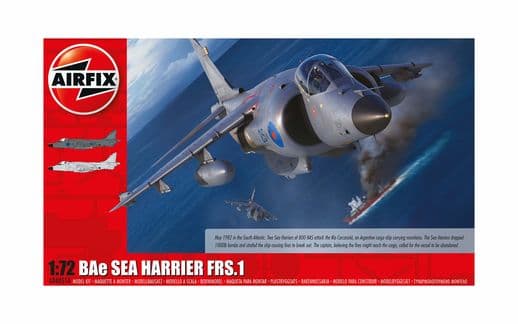
The Falklands War would see the Royal Navy’s Sea Harrier fleet defender establish its historic credentials as an effective fighting aeroplane and give an account of itself which few in the British military could hardly have anticipated. Significantly outnumbered by their Argentinean opponents, the Sea Harrier proved to be the ideal fighting aeroplane in these unusual circumstances, flown by brave, well trained and determined pilots, but possessing fighting qualities which their opponents aircraft simply could not match. As we are now only a few short weeks away from marking the 40th anniversary of this famous conflict, our own scale kit tribute to the fighting qualities of the Sea Harrier FRS.1 has just been released and as such, we hope readers won’t mind too much if we take another look at the two scheme detail options which are included with this latest release from our 1/72nd scale Sea Harrier tooling.
The Fleet Air Arm introduced the navalised variant of the Sea Harrier into service just short of ten years after the RAF had taken delivery of their first Harrier jets, but whilst the Royal Air Force were using their aircraft as a hugely successful strike and close air support aircraft, the Navy needed their Harrier to be an effective fleet defender. With the retirement of the Navy’s large aircraft carriers, along with their Sea Vixen and Phantom jets, the diminutive Harrier presented them with a viable fixed wing jet aircraft and one which was both versatile and extremely capable. Well suited to life aboard a smaller British carrier, the Sea Harrier was tasked with providing Fighter, Reconnaissance and Strike support for the fleet and its crews trained exhaustively in the art of modern aerial jet combat.
Despite the fact that Sea Harrier pilots were facing odds approaching 10:1 against them when heading down to a potential Falklands showdown, they were supremely confident not only in their own abilities, but also those of their aircraft, one which was equipped with the latest US produced AIM-9L Sidewinder air to air missile. In combat trials during their exhaustive training, Fleet Air Arm pilots flying the Sea Harrier against all of the current Western jets in service proved the excellent fighting qualities of their aircraft, and under the most rigorous of controlled mock combat situations, managed to post some impressive results. Against such aircraft as the Phantom, the Sea Harrier managed to ‘out-combat’ the Phantom by a score of 24:1 and even when pitted against the US F-15, an aircraft which was widely regarded as the ultimate air superiority fighter of the day, the Sea Harriers were reputedly coming out on top by a score of 3:1. Crucially, Sea Harrier pilots were completely aware of their aircraft’s strengths and weaknesses and were determined to give a good account of themselves in combat. As for the Argentinean military, they had a huge respect for the Sea Harrier and knew their airmen would be coming up against an extremely capable adversary.
This lead scheme option and the one which inspired the artwork which will grace the box of this impending release, will allow modellers to produce a scale example of this Falklands aviation classic and one which was as capable of performing strike attacks, as it was defending the ships of the Royal Navy.
The full scheme details for Sea Harrier FRS.1 XZ459/25, which was involved in the attack against the Rio Carcarañá on 16th May 1982.
With Argentine forces dug in to positions around the Falkland Islands, one of the most critical aspects of the Falklands conflict was the enforcement of the British declared Total Exclusion Zone around the Islands. Knowing that any aircraft or vessel entering this zone was likely to be hostile and now in a war zone, they also knew they were a legitimate target and could come under attack without further warning, something which highlighted the seriousness of this escalating situation. Argentinean troops stationed on the Falklands would have to be supplied by sea, so a crucial part of the British battle plan would be to ensure this didn’t happen.
On 16th May 1982, patrolling British aircraft spotted the Argentine supply ship Rio Carcarañá heading for the Islands and whilst they would not have been able to definitively ascertain its cargo from the air, it was actually carrying munitions and other military hardware destined for the forces stationed on the Falkland Islands. Continuing to steam for the Islands despite being detected, the sighting was reported to the Task Force Flagship HMS Hermes and two Harriers were readied to launch an immediate attack. Taking off from the carrier’s deck at around 16.00, the two Sea Harrier FRS.1 jets were XZ459 and XZ494, with each carrying two 1,000lb retard bombs and a full load of ammunition for their 30mm Aden Cannon.
Attacking the Rio Carcarañá at speed, the pair (which included Sea Harrier XZ459) managed to place two bombs in the hull of the ship, before making several strafing runs against the now blazing ship. With the fires threatening to engulf the ship and detonate its volatile cargo, the captain gave the order for his crew to immediately abandon ship, taking to the ocean leaving the stricken vessel to flounder on the water. Miraculously, the fires burnt themselves out without causing the expected explosion and the Argentinean Navy were later able to recover the vessel and tow her to Fox Bay. On inspecting her cargo, nothing was found to be in a usable condition, confirming that the Sea Harriers had done their work - the ship was simply left to her fate, which would be destruction at the hands of the Royal Navy on 24th May, at the hands of two Sea Skua missile equipped Lynx helicopters.
Following her service during the Falklands Conflict, Sea Harrier XZ459 was later upgraded to FA2 standard, the final variant of this magnificent Fleet fighter. She is now one of the prized exhibits at the Tangmere Military Aviation Museum, a true aviation combat veteran from a conflict which took place 8,000 miles away, 40 years ago next year.
From the modeller’s perspective, one of the most fascinating aspects of the Falklands Air War and the mammoth logistical challenges facing the British Task Force was the general presentation of the Sea Harriers based aboard HMS Hermes and Invincible. Initially made up of aircraft from Nos.800, 801 and 899 Naval Air Squadrons, the Sea Harriers seen on the decks of the two carriers as they left Portsmouth harbour at the start of their epic 8,000 mile journey were still wearing their standard FAA schemes of gloss extra dark sea grey upper surfaces and white undersides, complete with their colourful unit markings. From 10th April, all aircraft started receiving low visibility paint modification, which saw the white undersides overpainted with extra dark sea grey and the roundels having their white centre painted over in roundel blue.
This work was not carried out in exactly the same manner aboard both ships, as the aircraft carried by Hermes applied their paint using brushes, whilst paint teams on Invincible used spraying equipment to complete the job. It would later transpire that the paint applied by brush much harder wearing in operation and how some of the aircraft spray painted on Invincible appear to have slightly lighter undersides on photographs taken at the time. Obviously, all the flamboyant tail markings also fell victim to the application of extra dark sea grey paint.
This was not the only Sea Harrier paint anomaly of interest to the modeller during the Falklands Campaign. As the Fleet Air Arm rushed to provide additional aircraft and pilot reinforcements for the coming conflict, they gathered suitable aircraft currently in storage and those assigned to other duties and prepared them for operational service. Assigned to a reformed No.809 NAS, during this intense period of training and operational work-up, the aircraft were painted in a different low visibility scheme of satin medium sea grey, with barley grey lower wings. In addition to this, these aircraft also sported even lower visibility roundels featuring pale blue and red paint, which could even be described as a little opaque in appearance. These were only carried either side of the forward fuselage, with no wing marking used either top or bottom.
It is also interesting to note that whilst the colours for these schemes were being perfected at Farnborough, a team of model builders were commissioned to produce several 1/24th scale Airfix Harrier Super Kits, so they could assess the visual effectiveness of each proposed scheme on the largest Harrier model available at that time.
The modified container ship Atlantic Conveyor was commandeered to transport essential equipment and stores to the battle zone, including Chinook and Wessex helicopters, along with 8 Sea Harriers (of the reformed 809 NAS) and 6 Harrier GR.3s. The Chinooks would be Britain’s only heavy lift helicopters in the South Atlantic and the Sea Harriers were needed as cover for expected combat losses during the coming conflict. The Harriers would not be loaded on the vessel prior to her sailing from the UK, as training and preparation was ongoing - they would be meeting her at Ascension Island.
The aircraft which were delivered to the Falklands Task Force from the deck of the Atlantic Conveyor looked very different from the ones which set sail aboard the British carriers leaving Portsmouth at the beginning of April 1982.
Following work-up at RNAS Yeovilton, the Sea Harriers (6 first, with two others following on) were to be flown to Ascension Island via Banjul (The Gambia), with the support of RAF Victor tankers from Marham. The aircraft would take on fuel ‘little and often’ during the transit flights, ensuring that should any plane need to make an emergency divert, they would have enough fuel to do so safely. With all aircraft safely on the ground at Wideawake Airfield on Ascension Island by early May 1982, all eight of the Sea Harriers made vertical landings on the deck of Atlantic Conveyor on 6th May and prepared for their onward journey to meet up with the Task Force.
On the 18th and 19th of May, all eight Sea Harriers had flown off the Conveyor and to their assigned carrier, with the transfer of the 6 GR3s being completed by the following day. Mistaken for one of the British carriers, Atlantic Conveyor was struck by two Exocet missiles fired from Argentinean attack jets just five days later, with all remaining aircraft stored on the ship destroyed by the resultant fire - thankfully, the Sea Harriers/Harriers and a solitary Chinook were not amongst this number.
Sea Harrier FRS.1 XZ458 would go on to fly 45 operational sorties during the Falklands conflict and would be piloted by such famous names as ‘Sharkey’ Ward, Ian Mortimer and Dave Braithwaite, but without scoring any confirmed victories. On return to the UK, the aircraft spent some time in storage, before being destroyed in a crash following a bird strike near Fort William, with the pilot thankfully managing to eject successfully. It seems as if a Scottish seagull managed to do what the combined might of the Argentinean Air and Naval Air Forces could not.
Box artwork layout for our recently released 1/72nd scale BAe Sea Harrier FRS.1 kit, which may just be the ideal build project to mark the impending 40th anniversary of the Falklands War.
A really important aircraft in the history of British aviation, the details behind the two scheme options to be included in this forthcoming kit release illustrate how this navalised variant of the Harrier was just as adept at strike operations as it was at protecting the Fleet from air attack. For Britain’s Falklands Task Force, this was perhaps just as well, because the logistical and military challenges facing them if they were to successfully re-take the Falkland Islands were daunting and their relatively new Sea Harriers would be forced to take on and prevail against much greater numbers of Argentinean fighters. The conflict would prove to be a defining moment for the legacy of the Harrier and more specifically, the Sea Harrier. It also helped to underline the importance of effective naval air power and how the Royal Navy was still the most effective force in allowing Britain to maintain her international influence.
With both scheme options having such fascinating stories behind them, the recent release of BAe Sea Harrier FRS1 A04051A will present modellers with something of a build dilemma, but as we head for the 40th Anniversary of the Falklands Conflict, could there possibly be a better time to add a Sea Harrier to our current build schedule? Possessing a combat record which places it in an exclusive group of post war aircraft which have engaged in aerial combat, but have suffered no combat losses themselves, the Royal Navy’s Sea Harrier has to be considered something of an aviation classic and one which served Britain with distinction some 8000 miles from home.
For both Airfix enthusiasts and modelling hobbyists alike, a few moments spent discovering the various sections of the Airfix website is never wasted time and will always reveal something interesting, be that notification of the latest model releases, or some helpful tips on a modelling quandary you have been struggling to overcome. Acting as an effective central information hub for all things Airfix, as well as providing all the details you might need on models which make up the current range, our Community section includes helpful tips and advice, as well as access to almost seven years of Workbench and Aerodrome blogs - can you believe we have been doing this for that long? For those looking for a quick Airfix fix, our various official social media channels always have their finger on the modelling pulse and can always be relied upon to include something interesting and topical.
With video content now becoming such a popular feature of everything we do, the website also includes links to instructional videos, our official YouTube channel and our regular video magazine programmes, which now boasts a new series, ‘Sprue Talk’. With the first edition going live recently, this new series is an informal, round the table discussion which we hope will answer many of the question modellers are interested to find out about, from both a manufacturing and general modelling perspective. Each edition will feature different members of the Airfix team, so not only will you have the opportunity to put faces to names, but you will hopefully also discover something different every time.
Would you like to put a face to the name, or even a question to the team? Our new ‘Sprue Talk’ feature will allow you to do both!
The first edition is now live and features our Head of Brand, Dale Luckhurst and Researcher, Luke Slaney-Hewitt discussing several of the latest kit releases and what it takes to get them to market. Sprue Talk is just another reason to visit the Airfix website regularly and we look forward to seeing you all there.
That’s all we have for you in this latest edition of Workbench, but we will be back as usual next Friday with more modelling news, updates and exclusive imagery from the fascinating world of Airfix. If you have any comments in connection with the blog, or would like to suggest a subject to be covered in a future edition, please do drop us a quick line using our workbench@airfix.com e-mail address. The Airfix team would be only too pleased to hear from you.
If you would like to continue the Airfix modelling discussions between editions of the blog, the Airfix Workbench Forum is the place to be, however, if you simply wish to keep up to date with all the latest Airfix modelling news, you can access our official social media sites, or simply head for the Airfix website, where you will find all the details you need.
If you have yet to add our sites to your favourites, you can find links to our Facebook, YouTube, Twitter and Instagram sites at the bottom of our website homepage.
Thank you for continuing to support our Airfix Workbench blog.

