
For anyone with even the slightest interest in what Winston Churchill called ‘The Battle of Britain’, this summer will allow us the opportunity to pay our respects to the brave airmen who struggled against overwhelming odds during the dark days of 1940. With the passage of time, many of us could be described as having a slightly distorted view of the struggle faced by both RAF and Luftwaffe aircrews during the battle - our mental picture of vapour trails, high in the blue summer skies above southern England and central London, give a rather sanitised view of what these young men were being forced to endure on a daily basis. Importantly, it was also not just about Spitfires and Hurricanes, although these famous aircraft did form the backbone of the RAF’s response to the Luftwaffe’s onslaught. In the latest edition of Aerodrome, we will look at one of the more unfashionable aircraft involved in the Battle of Britain and how it was involved in one of the most significant aircraft recovery projects of recent years.
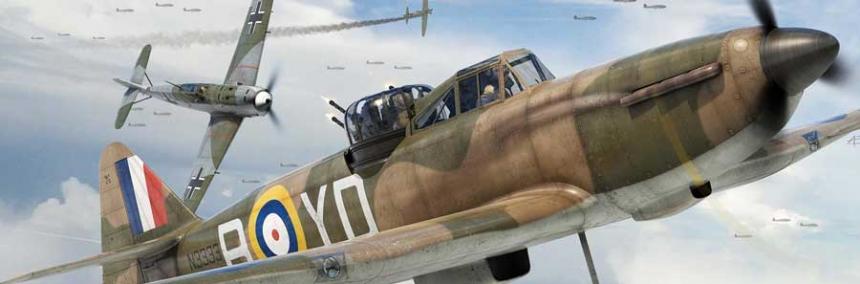
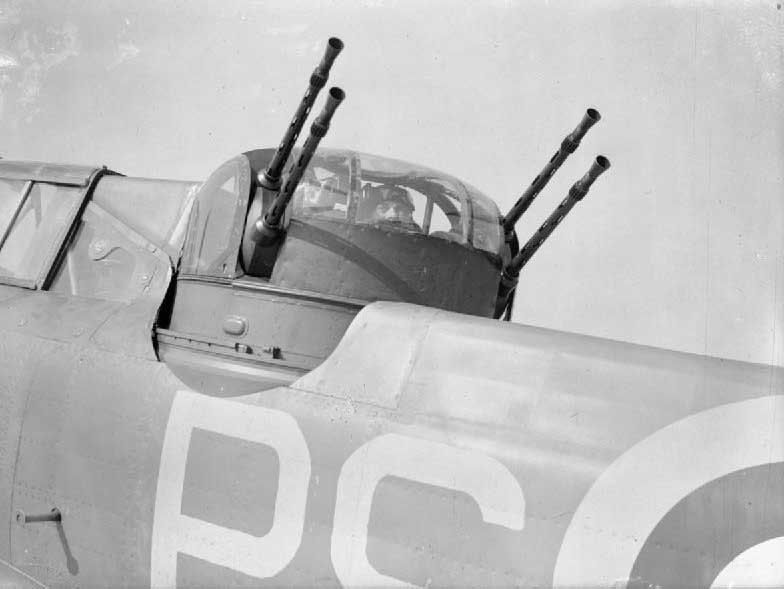
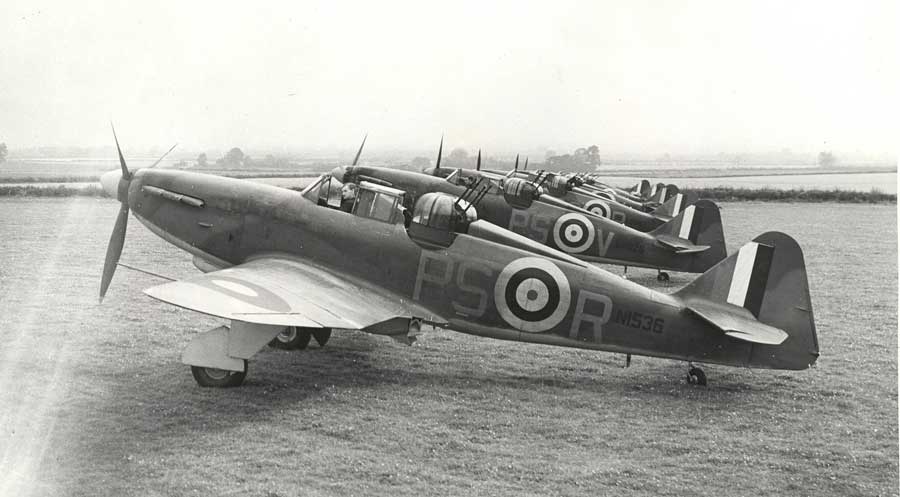
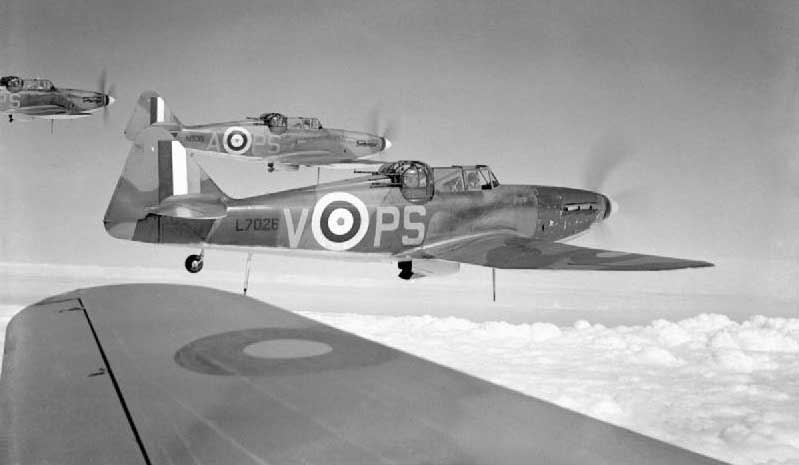
The Boulton Paul Defiant was a British two seat interceptor aircraft, which actually entered Royal Air Force service after both the Spitfire and Hurricane. It was unique amongst RAF day fighters in that the design incorporated a dorsal turret for offensive armament, which housed four 0.303 inch Browning machine guns, giving the Defiant an impressive arch of fire. Unfortunately, the aircraft was powered by a single Merlin engine and the additional weight of the turret and second crew member dictated that the Defiant was slower and less manoeuvrable than either the Spitfire or Hurricane. It also had no forward firing defensive armament and although the turret could be positioned forward facing, the guns had to avoid the disc of the turning propeller and importantly, the pilot did not have the benefit of a forward facing gun-sight – as a result, this manoeuvre was rarely used in combat. In the melee of a dogfight, the Defiant resembled a Hawker Hurricane in profile and this fact caught out a number of attacking Luftwaffe fighter pilots in early engagements over the French coast, resulting in them taking an unwelcome dip in the English Channel. They learned their lesson quickly though and tactics were soon developed to combat the turret fighters and the tables were quickly turned in the Luftwaffe’s favour.
I have to say that I personally find the Defiant to be one of the most interesting aircraft of WWII and even though it was much maligned as a combat aircraft, I think that some of the criticism levelled at it is more than a little harsh. At the time the Defiant entered service, operating conditions could not have been more challenging. The Luftwaffe were sweeping all before them in Continental Europe and their significant superiority in numbers dictated that Defiant squadrons could not rely on the fighter protection that would have surely seen it become a devastatingly effective bomber destroyer. As it was, it was forced to defend itself against the highly capable Messerschmitt Bf 109 ‘Emil’ fighter, which was simply in a different class to the Defiant and could make life extremely difficult for the crew of a turret fighter. Had constant fighter cover been available to them, the Defiant was even capable of taking on the Messerschmitt Bf 110 heavy fighter and giving a very good account of itself and such Luftwaffe aircraft as the Ju-87 Stuka, Dornier Do-17 and Heinkel He-III bombers posed no problem to the Defiant in combat.
Early combat operations with the new RAF turret fighter proved to be rather successful, with the additional arc of fire proving to be a very unwelcome surprise for the Luftwaffe. The usual method adopted by fighter pilots in securing an aerial victory was to close in behind your victim, where he would both find it difficult to see you and was not in a position to defend himself – if you managed to gain this position, you had your enemy just where you wanted him. Indeed any position behind your adversary and you were in a very advantageous combat situation.
Adopting these time-honoured tactics, Luftwaffe fighter pilots would feel that they had time on their side, when taking up a position above and behind the new RAF fighter, deciding how they were going to press home their attack and claim their latest victim. When they were caught in a hail of bullets from the four 0.303 inch Browning machine guns of the Defiant, they realised that they had made a fatal mistake and would be lucky to escape with their lives. Initially, large numbers of Luftwaffe aircraft were to fall to the turret guns of the Boulton Paul Defiant, as they were totally unprepared for it’s wide firing arc and devastating concentration of fire, but fighter pilots are clever and it would not take them long to learn from their mistakes.
The most successful day for RAF Defiants came on 29th May 1940. Flying operations in support of the evacuation of troops from the beaches of Dunkirk, Defiants of No.264 squadron were to claim 37 Luftwaffe aircraft destroyed in two operational sorties that day. Amongst the enemy aircraft claimed as destroyed were nineteen Ju-87 Stukas, many of which were destroyed as they pulled out of their bombing dives, nine Messerschmitt Bf 110 heavy fighters, eight Messerschmitt Bf 109 fighters and a Ju-88 bomber. Importantly, these impressive figures were obtained for the loss of just one Defiant air gunner, which is certainly worthy of further explanation. The Defiant in question was involved in combat with a Messerschmitt Bf 109 fighter, which was proving to be particularly persistent with his attentions. In order to try and shake it from his tail, the RAF pilot was undertaking a series of violent evasive manoeuvres, which seemed to be going on for longer than usual. The gunner could either not get a clear shot at the enemy fighter, or his guns, or even the powered turret had jammed, but whichever was the case, he could see bullets flashing past the Perspex of his station. As he could not contact, or even see his pilot, he must have assumed that the violent ride was as a result of him being killed, so he released his harness and baled out from the turret. The Defiant managed to evade the attentions of the Messerschmitt and made it back to base, where it was repaired and retuned to active duty – As a result of its return, no RAF No. 264 squadron Defiants were lost on that day.
As far as the RAF’s new turret fighter was concerned, this was certainly to be the high point of its effectiveness as a day fighter. The Luftwaffe quickly learned to keep out of the way of its gun turret and developed effective tactics to exploit the Defiants lack of manoeuvrability and forward firing armament. To act as something of a sobering lesson for the RAF, the Defiants of No.141 squadron were to suffer a very bad day on 19th July 1940. Sent to provide cover for a convoy just off the coast of Folkestone, the aircraft were immediately attacked by Messerschmitts of Jagdgeschwader 51, who made short work of the Defiants. Of the nine aircraft attacked by the Luftwaffe fighters, seven were shot down almost straight away, with the remaining two suffering significant damage – indeed, these two damaged aircraft only made it back to their base, thanks to the intervention of Hurricanes from No.III squadron. The Defiant simply could not be sent against Bf 109 fighters, unless they had fighter protection of their own, without disastrous consequences.
A very interesting engagement occurred on 26th August 1940 and I am going to try and do something a little different with the details.
The morning of 26th August was bright and fine on the airfield at RAF Hornchurch, with just some early morning mist to clear. It was clear that the pilots and gunners of No.264 Squadron (A flight) would be in demand again that day, but their Defiant fighters were amongst only 18 serviceable machines available to the RAF on that morning. Over the past few days, the RAF had been subjected to a significant Luftwaffe onslaught and both aircrew and ground staff were almost at the point of exhaustion, but on this particular day, it looked as if the Luftwaffe were going to be a little late.
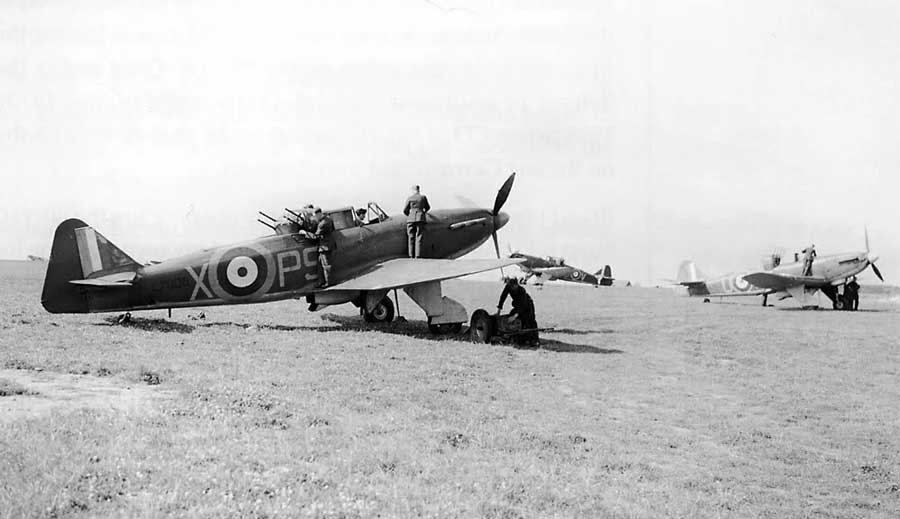
Flight Sergeant Edward Thorn and his long time air gunner friend Fred Barker, were already amongst the most successful Defiant crews in the Royal Air Force, having already claimed at least eight enemy aircraft destroyed, over the past few months. They were fully aware of the limitations of their aircraft, but were expert in ensuring that it was positioned to maximise its unique strengths. They had seen some savage aerial fighting over the past few weeks and they were only too aware of what was at stake. Looking over their aircraft L7005 (PS-B), it was fully armed, fully fuelled and ready for action – it was likely that they would be needed at some point this day.
Just after 11am, a significant force of one hundred plus Luftwaffe aircraft were forming up over the pas-de-Calais, for a raid against targets in the Kent area, which included the RAF airfields at both Biggin Hill and Kenley. RAF radar operators had detected the formation of German aircraft and a number of squadrons had been scrambled to intercept the raid.
At approximately 11.42am, the Defiants of ‘A Flight’, No.264 Squadron at Hornchurch, were scrambled to intercept a raid of enemy aircraft approaching South East Kent, supporting squadrons of Spitfires and Hurricanes already on their way. Quickly getting into the air, the Defiants of ‘A Flight’ struggled for height and headed for the Kent coast – the four machine guns were cocked, gun sights were switched on and eyes were peeled for signs of action.
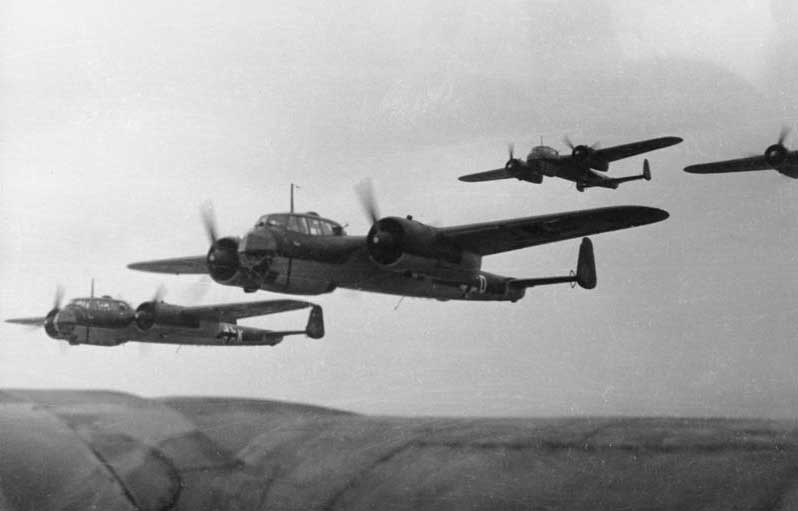
When the aircraft arrived over the Thanet area of Kent, they quickly spotted the enemy aircraft and engaged them immediately. A flight of twelve Dornier Do 17 bombers from 7./KG.3 were intent on striking Fighter Command bases and the Defiants were determined to stop them. Always wary of Luftwaffe fighter escort, they pressed home their attack on the Dorniers, targeting the vulnerable underside of the bombers and opening fire on them with all twenty-four guns available to the Defiant gunners. They raked the bombers with gunfire and over the course of the next few minutes, six of the Dorniers were shot down – one of the machines, 5K+AR (Werk No.1160) took multiple machine gun strikes to its engines and immediately fell out of formation, to crash land on the water above nearby Goodwin Sands. There will be more about this particular aircraft a little later.
Back with the dogfight melee and the Defiant of Thorn and Barker had already dispatched two Dornier bombers, before the German fighter escort arrived on the scene in some numbers. Led by the ‘Ace’ Geschwaderkommodore of JG.3, Gunther Lutzow, the Messerschmitts tore into the RAF Defiants, shooting a number of the aircraft down on their first pass. Sgt. Thorn’s Defiant was hit and began to burn – as he was still in control of his aircraft, he placed it into a steep dive, in an attempt to put out the flames. His air gunner, Sgt. Barker, could not raise his pilot on the intercom and thinking that he had therefore been killed, began to release himself from the gun turret. As he attempted to wriggle free from his seat, he could see that his pilot was still very much alive and in control of the aircraft, so he returned to his station and grabbed the gun control column. As he looked up at the gun sight, a second Messerschmitt loomed large in the lens, intent on making their situation a whole lot worse – Sgt. Barker immediately pressed the fire button and all four guns spewed metal into the engine of the Bf 109. He saw the fighter gently roll on to its back and head toward the ground at a steep angle – they now had two Do.17s and a Bf 109 to add to their victory tally.
Defiant L7005 was now in a pretty poor state and Sgt Thorn had to execute a forced landing as a matter of some urgency. Finding a suitable spot near Chislet, in Kent, Thorn managed to make what both crew men described as a bit of a rough crash landing, with both men quickly running away from their aircraft, taking cover in a nearby ditch. The on board fire immediately took hold of the Defiant airframe, which was completely burned out in no time.
Anyone with even a passing interest in the air battles of WWII, can’t help but be impressed with the character and ability of the ordinary men, who were engaged in doing unbelievably extraordinary things. I would certainly count myself firmly amongst this group, but what happened to Thorn and Barker next absolutely fascinates me and perfectly illustrates the human aspect of the Battle of Britain and how these young men approached their duty. Having cheated death and accounted for no less than two Dornier bombers and a Bf 109 fighter in the space of just a few frantic minutes, Thorn and Barker were arrested by the local Home Guard. Once they had managed to prove their credentials, they were joined by fellow squadron-mate Arthur Banham, in trying to get themselves back to their home station. Looking slightly dishevelled and still clutching their parachutes, life jackets, flying helmets and other flying paraphernalia, the trio used main line and underground trains to travel back to RAF Hornchurch and they recounted that not one of their fellow travellers paid the slightest bit of attention to them! How could this possibly be? These men were hero pilots – they were ‘The Few’!
For their display of gallantry in the face of enemy fire, Both Thorn and Barker received a bar to their existing Distinguished Flying Medal.
Following the devastating losses suffered by Defiant crews during the Battle of Britain, the type was withdrawn from front-line action, as a result of the events of 26th August. The remaining aircraft were sent north, where they could provide protection for cities in the Midlands and the North and allow exhausted crews to re-train for night-fighter operations. The final battle statistics around the events of 26th August 1940 were as follows: Six Dornier Do.14 bombers and one Bf 109 destroyed – two of the Dorniers and the Messerschmitt were credited to Defiant L7005, which was crewed by Sgt’s Thorn and Barker. RAF losses were three Defiants destroyed, with a further machine badly damaged – two of these aircraft fell to the guns of JG.3 ace Gunter Ludzow, who was to ultimately achieve 110 aerial victories, but like many fighter pilots, did not survive the war. Before we move on from these statistics, it is important to note that Sergeants Thorn and Barker were to end the war as the most successful Boulton Paul Defiant crew, with thirteen enemy aircraft destroyed, all of which were achieved whilst operating the aircraft as a day fighter, over Northern France and Southern Britain. These were clearly very special men indeed.
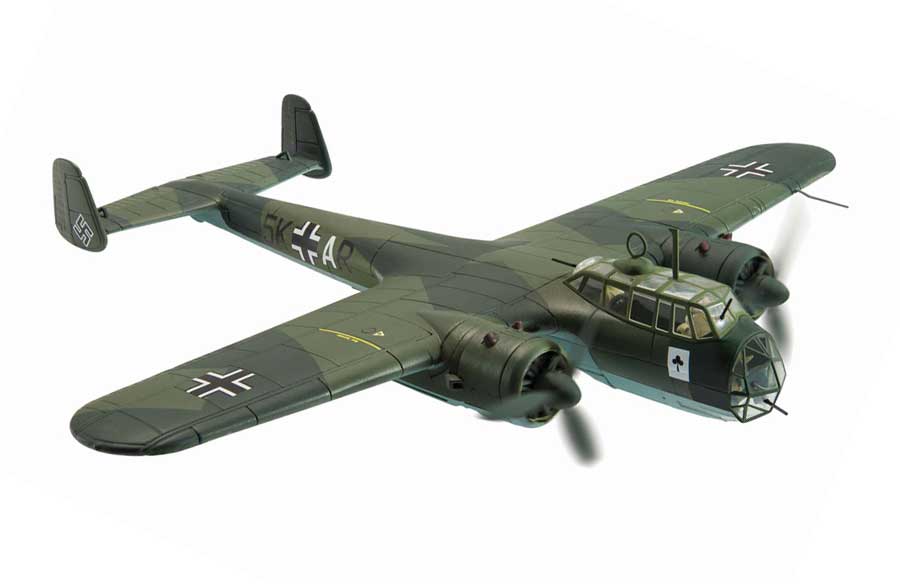
A recent, high profile project to raise a rare WWII Luftwaffe bomber from the Goodwin Sands brings the incredible events of 26th August 1940 to a fitting end – it is also one of the aircraft to fall to the guns of RAF No.264 Squadron Defiants. We have looked at what happened to the Defiant flown by Thorn and Barker on that day, so let’s now focus on one of the aircraft that they faced – Dornier Do.17-Z2 (Wk.nr 1160) 5K+AR.
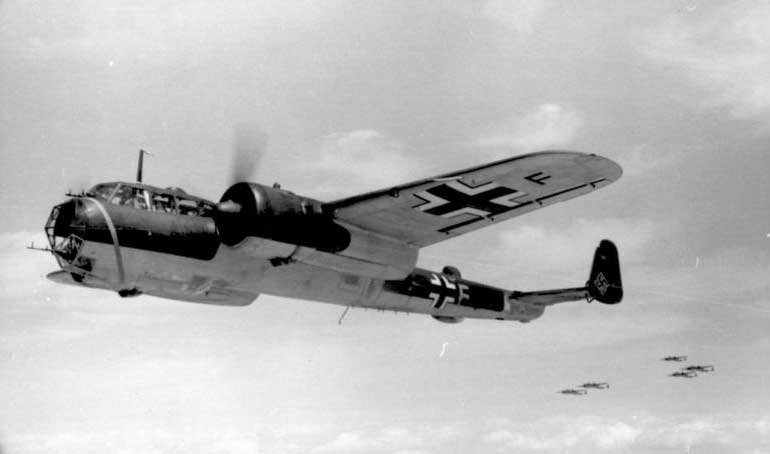
On the morning of 26th August 1940, the four-man crew of Dornier Do.17z 5K+AR prepared their aircraft for flight - loaded with just over 2,000Ib of bombs, they took off from their home base at St. Trond aerodrome, near Brussels. Their aircraft was to be part of a raid by twelve bombers, sent to attack the Fighter Command airfield at Manston on that day, but not everything was as it seemed – the raid was to be a diversionary attack. Covering the Dorniers was a force of fifty Messerschmitt Bf 109 fighters, intent on luring the RAF into a dogfight, where they would be ‘bounced’ by the waiting Messerschmitts. The plan was to work as intended, but not before the Royal Air Force had ensured they had a significant say on the days proceedings.
Britain’s effective incoming raid warning systems had already identified the approaching force and RAF fighters were en-route to intercept the Dorniers, as they set course for the Kent coast – within minutes, a savage air battle had ensued.
As Dornier 5K+AR approached the Kent coast, it was flying just above thick cloud, which caused the pilot to temporarily lose his bearings and his aircraft began to fall behind the main formation. Suddenly, the bomber was attacked by a flight of RAF Defiant fighters and was caught in a hail of .303 machine gun bullets. Their aircraft took multiple strikes to the engines and cockpit area and their mission was now one of survival. One engine had already stopped and the other was damaged – pilot Feldwebel Willi Effmert and his observer Hermann Ritzel had both sustained injuries and they had to get the aircraft down quickly. The order to jettison the bombs was given and Effmert looked for a place to set his aircraft down. He headed for a stretch of shallow sea, just off the coast of Kent, which is known as the Goodwin Sands – this was clearly a one-chance operation. The aircraft approached the sea at high speed, but the pilot did an excellent job in configuring his Dornier for the emergency landing. Unfortunately, due to the high speed, the aircraft came to rest following a final somersault, resting upside down on the sand – both Effmert and Ritzel survived the experience to become prisoners of war, but their two comrades Helmut Reinhardt and Heinz Huhn tragically lost their lives. Their bodies were washed up on either side of the Channel, in the coming few days – the notoriously shifting Goodwin Sands soon swallowed up the stricken Luftwaffe bomber.
In 2008, the Goodwin Sands shifted once more, revealing a secret that they had been hiding for over 68 years. Divers discovered the wreck of an aircraft, which appeared to be largely intact and quite close to the surface - the relative authorities were informed and the aviation world viewed proceedings with great interest. A full sonar scan survey took place and revealed that the aircraft was a very rare Dornier Do.17 ‘flying pencil’ – the aircraft was such an important find that an ambitious project to raise the aircraft was immediately initiated and detailed plans were drawn up.
In the world of historic aviation, this was an extremely significant development. As the salvage team went about their business, the world watched with interest as this relic from WWII was tempted from its watery resting place. Although the aircraft was relatively complete, it had been lying in salt water for over 70 years, survived the attentions of RAF Defiant fighters and hit the water at high speed. The shifting sands had filled every available void in the wreck, significantly increasing its weight and dramatically reducing the possibility of raising the aircraft in one piece – this was going to be a significant challenge for the salvage team and was by no means a forgone conclusion.

Images taken by Glen Richardson, Corgi
On 10th June 2013, Dornier Do.17z Werk Nr.1160 broke the surface of the English Channel for the first time in over 73 years, in remarkably complete condition. It was a total triumph for the salvage company, who had achieved something that looked highly unlikely, only days earlier. As soon as the wreck broke the surface, the project took on a new importance, as the rush was now on to preserve the aircraft from the elements and to save this very rare relic of the savage air combat of the Battle of Britain for generations to come.
The Dornier was transported to the Royal Air Force Museum Cosford, where it underwent a concerted period of highly specialised preservation, intended to stabilise the deteriorating condition of this unique airframe. As we approach the 75th anniversary of the Battle of Britain, this fantastic project is an extremely poignant reminder of the sacrifices made by young men on both sides of the Channel, during one of the most significant battles of WWII.
Many Aerodrome readers will already be aware that the fascinating subject of our latest blog is about to have two of the aircraft involved in this incident immortalised in die-cast metal. Any model releases featuring Battle of Britain subject matter are almost assured of commercial success, as the collector seems to have an insatiable appetite for this specific period of the war and I am absolutely certain that both of these impending releases will go exactly the same way. Both of the new models will be released in time to mark the 75th anniversary of the Battle of Britain and as we have seen few Aviation Archive releases over recent weeks, I can see both models being incredibly popular with collectors. The two models due for release are as follows:
AA38806 – Dornier Do.17z 5K+AR is the magnificent ‘flying pencil’ that was raised from the Goodwin Sands by the RAF Museum, on 10th June 2013. This was the aircraft shot down by Boulton Paul Defiant fighters of RAF No.264 Squadron, on the afternoon of 26th August 1940. Taking strikes to both engines and the cockpit area, the Dornier made an emergency landing off the coast of Kent, only to be swallowed by the ever shifting sands and hidden for the next seventy years. The aircraft is now undergoing a concerted period of preservation, at the Royal Air Force Museum, Cosford. This fantastic model is due for release by the end of July.
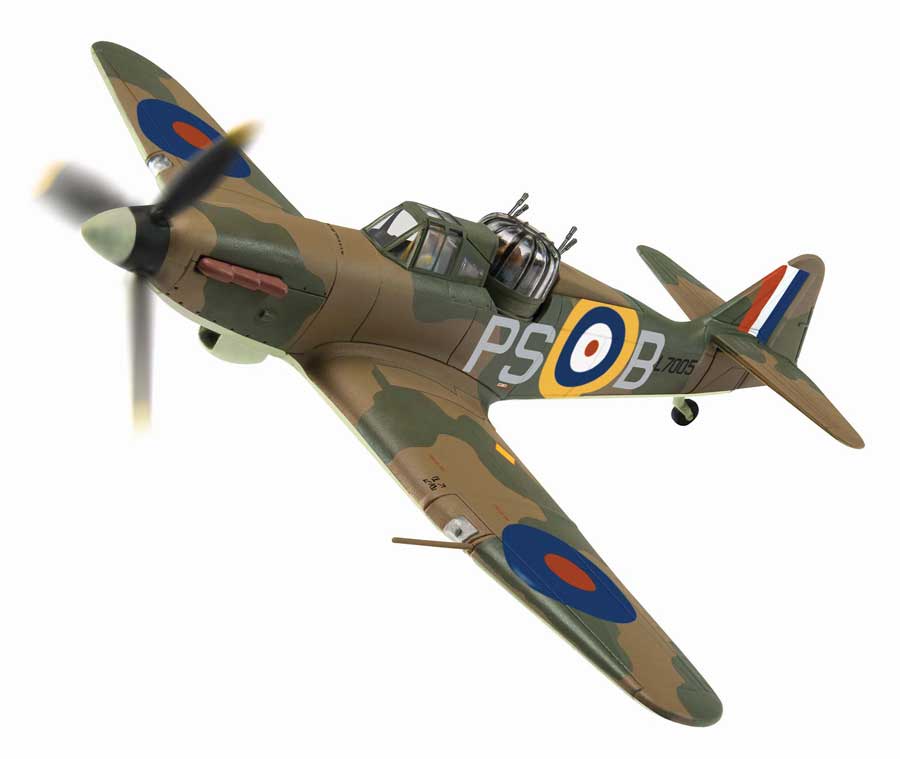
AA39305 – Boulton Paul Defiant L7005 (PS-B) was sent to intercept a force of Luftwaffe bombers approaching the Kent coast, on 26th August 1940. Flown by crack Defiant ‘aces’ Flight Sergeants Thorn and Barker, this aircraft shot down two Dornier bombers and a Bf 109E, before being in turn shot down by another Messerschmitt. Although it cannot be conclusively corroborated that this aircraft actually shot down the Goodwin Sands Dornier, it is highly likely that it was either this aircraft, or the Defiant flown by P/O Desmond Hughes and his gunner Fred Gash – both aircraft accounted for two Dorniers each, during this frantic engagement. Although Defiant L7005 was destroyed following this battle, a composite aircraft in these exact markings is now on display at the Kent Battle of Britain Museum, which is at Hawkinge. This model should be with your usual stockists by late Summer.
That's it for this week. You can discuss this week's blog on the Aerodrome Forum, and if you have any comments, questions or suggestions for future editions, please feel free to let us know on. In addition, you can contact me on Corgi Twitter feed using #corgiaerodrome.
I am sure that this will not be the last time that we visit the Battle of Britain in an edition of Aerodrome, but for this week, that is your lot. Thank you very much indeed for reading my latest musings, which I hope you found interesting. If you have not already done so, please make sure that you don’t miss out on the Goodwin Sands Dornier and Defiant release – until next week.
Michael

